Walking animation cycles can be confusing if you don't know which key poses to use.
In this article, we will answer how to make a walking animation. I have provided you with the key poses to model your walking cycles after.
What Does a Good Walking Animation Look Like?
A good walking animation looks lifelike and fluid. A beautiful walking cycle should also reflect the character's personality and the context of the scene.
What are the 9 Key Poses for a 24-Frame Walk Cycle?

Every 3 frames, your character will hit the next primary pose. Frame 24 is the last frame in the walk cycle. Frame 25 is the first frame of the next cycle. And the cycle is looped.
Here I have the right leg starting the cycle. But the left leg can start the cycle instead. It's up to you.
Frame 1 - Right Leg Contact Pose
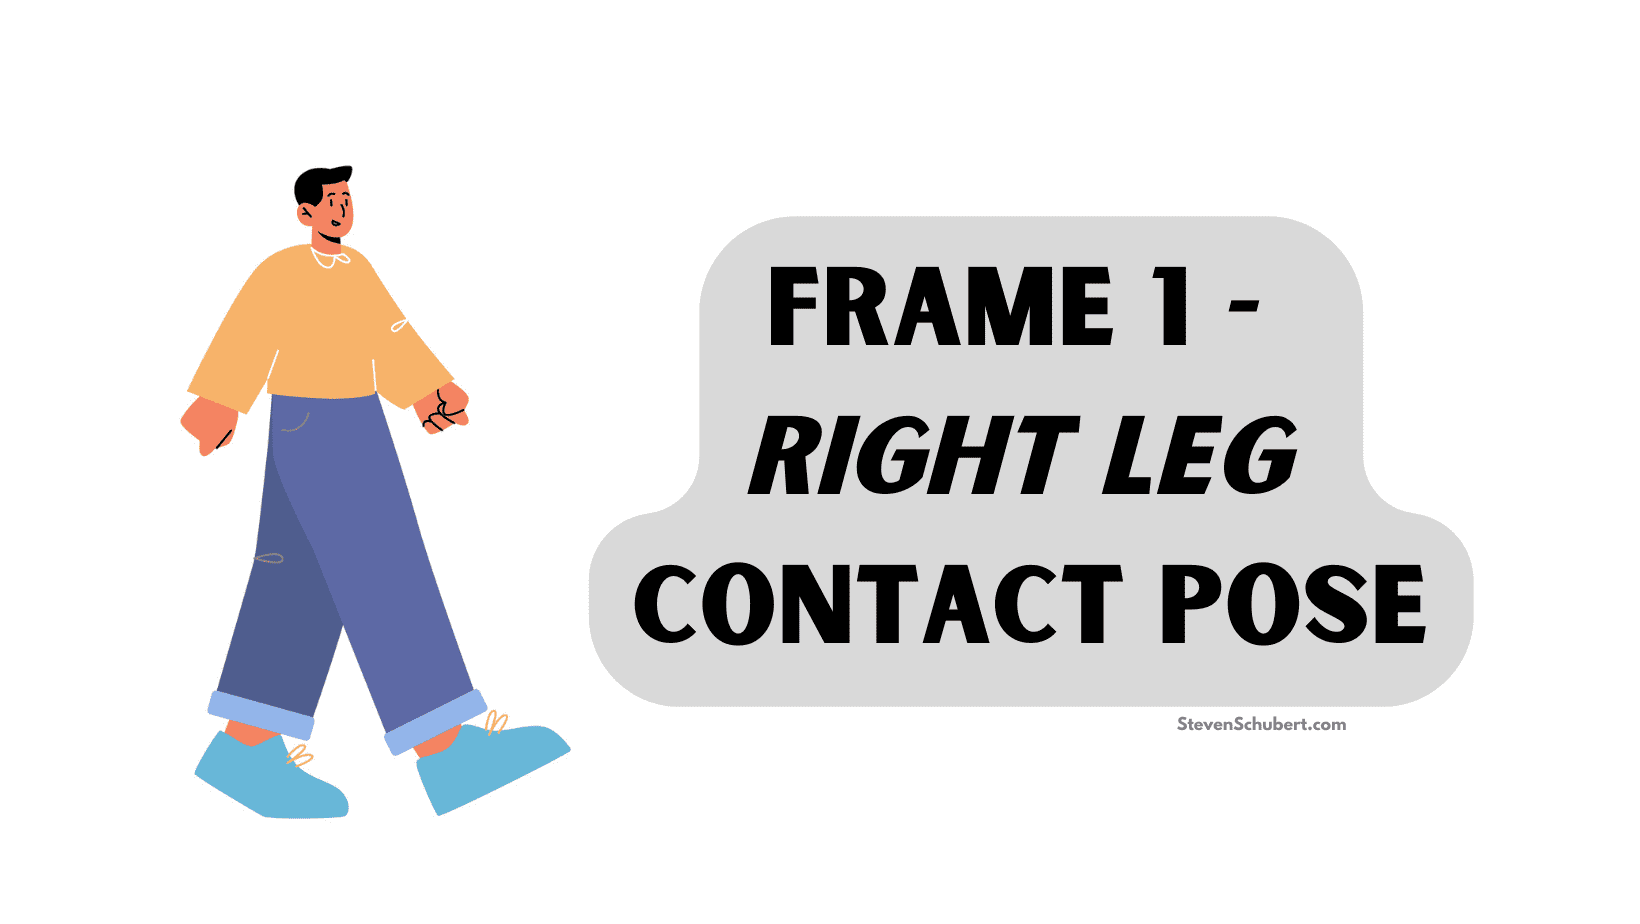
This is the first frame and the first pose of the walking cycle.
The 'Right Leg Contact Pose' can also be referred to as the forward contact point.
The right heel of the character touches the ground.
The trailing left foot is up on its toes, but not fully arched yet.
Both the right and left legs are extended in opposite directions.
The left leg is carrying the body's weight.
The arms are in opposition to the legs for balance, meaning if the right leg is forward, the right arm is back, and vice versa.
Correspondingly, the arms swing open to their maximum extent.
This pose sets the pace of the walk and initiates the repeating pattern of the walk cycle.
Frame 4 - Right Leg Down Pose
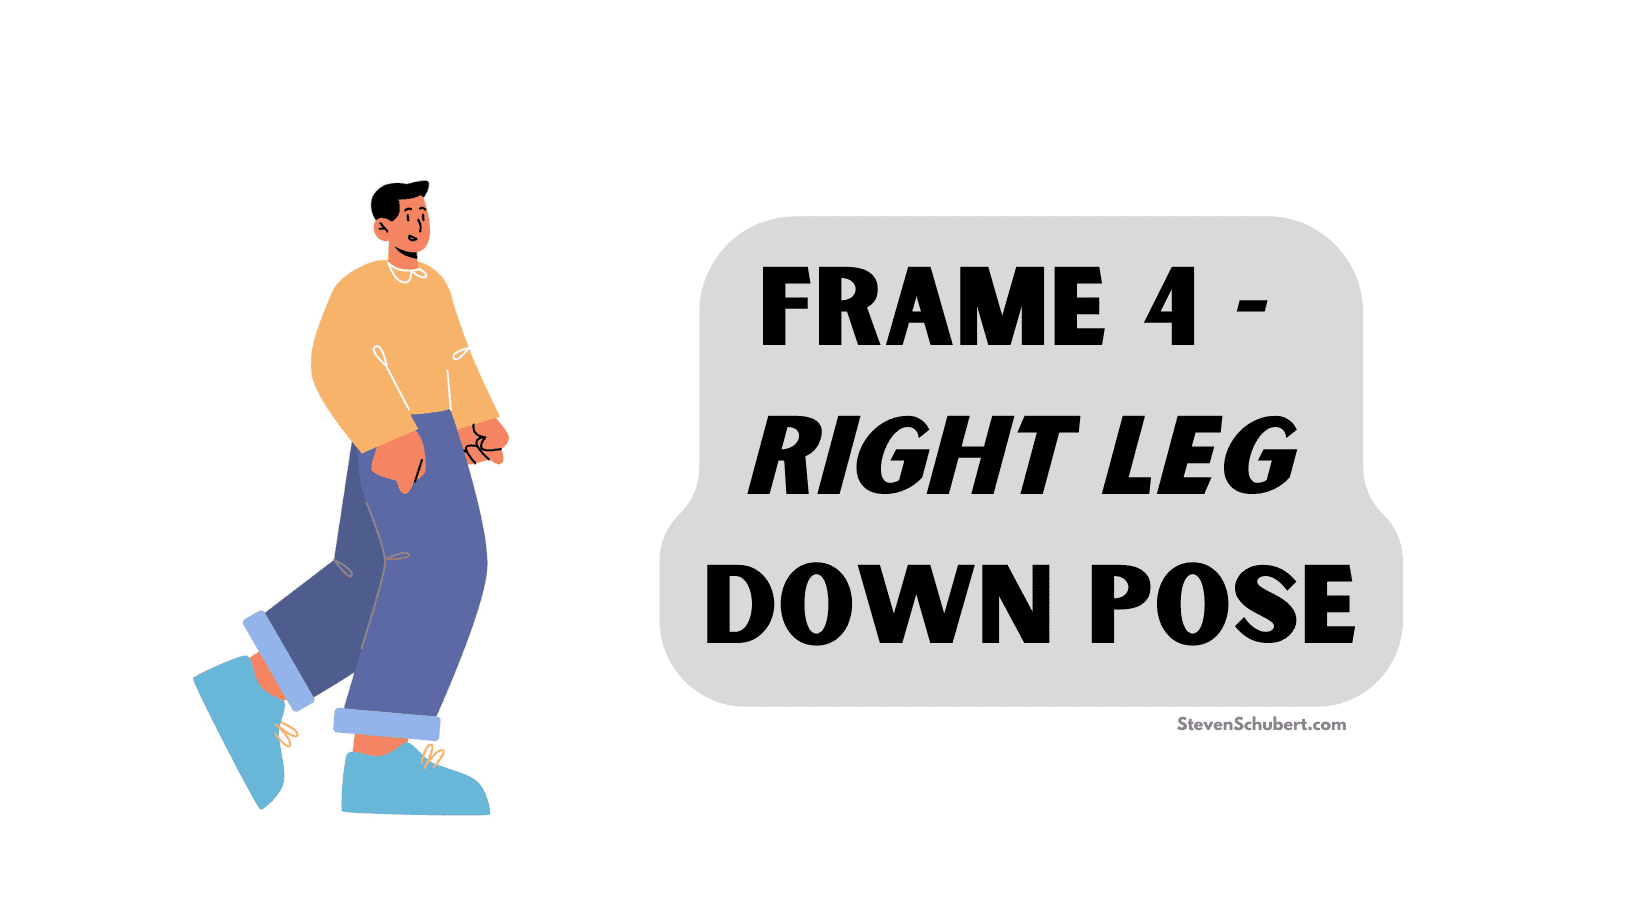
This pose occurs after the 'Right Leg Contact Pose'.
In the 'Right Leg Down Pose', the right foot is flat on the ground, bearing the full weight of the body, causing a slight downward shift.
The left foot is about to lift off the ground.
Both the right and left legs should be bent.
The arms swing back to a more neutral position.
This pose signifies the moment of greatest downward force and typically gives a sense of weight and gravity to the character's movement.
Frame 7 - Right Leg Passing Pose
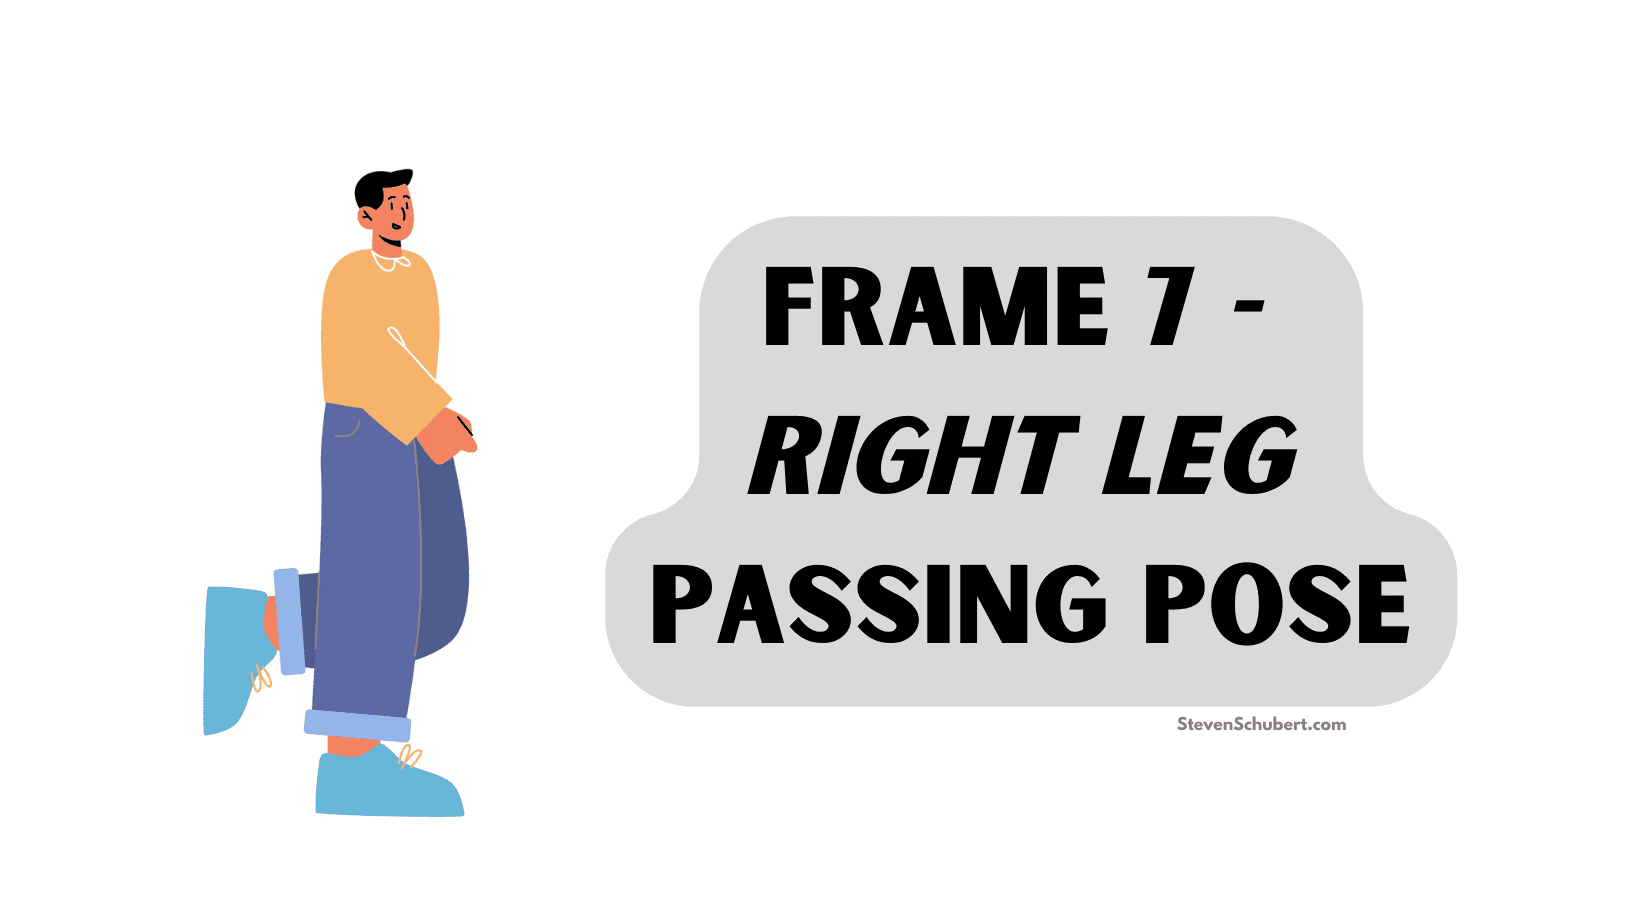
This first passing pose occurs between the 'Right Leg Down Pose' and the 'Right Leg Up Pose'.
In this passing position, the weight-bearing right leg is straight with the torso and directly beneath the body while the left leg is lifted, bent at the knee, and also beneath the body.
The left leg is passing by the standing right leg in preparation for the next step.
The arms are swinging passing each other as well.
This pose signifies a transition point in the walk cycle, marking the switch from one foot to the other.
Frame 10 - Right Leg Up Pose
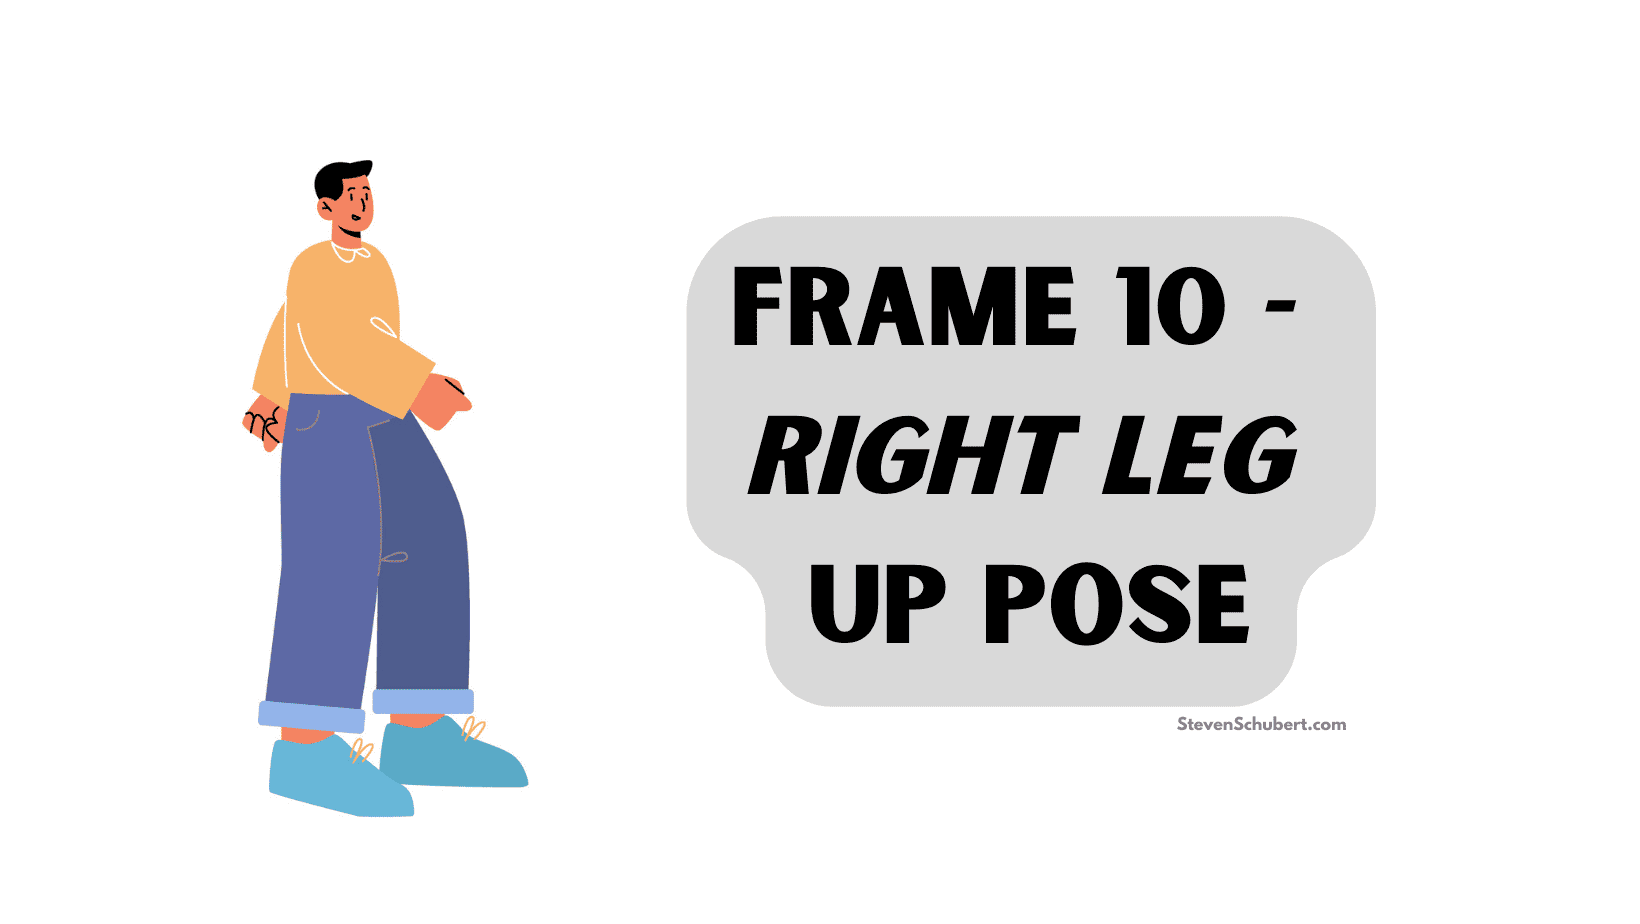
This pose happens directly after the 'Right Leg Passing Pose' and before the 'Left Leg Contact Pose'.
The front foot is now the left foot, and the right leg is now behind the body.
In the 'Right Leg Up Pose', the character's body is at its highest point as the right leg fully bears the body's weight.
The left leg is swinging forward, preparing to become the leading foot in the upcoming 'Left Leg Contact Pose'.
The arms continue to swing away from each other.
This pose gives a sense of the character's body being lifted and the stride's power and momentum.
Frame 13 - Left Leg Contact Pose
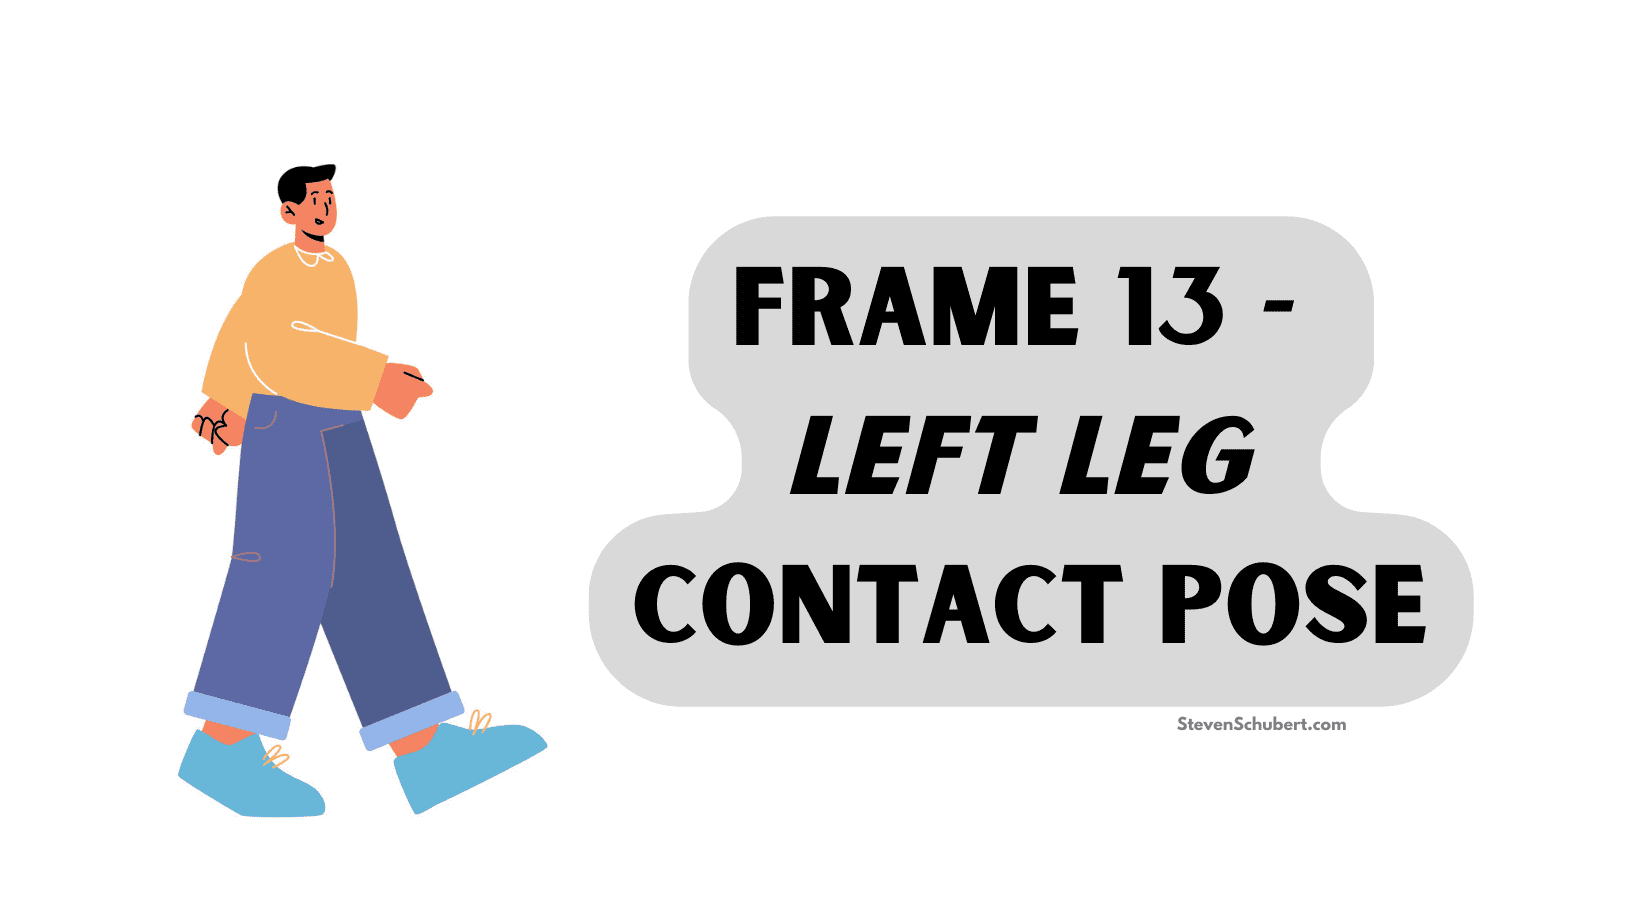
Frame 13 is the same as Frame 1, but now on the opposite leg.
The left leg takes the lead and we will mirror this process from the first 4 main poses.
The 'Left Leg Contact Pose' can also be referred to as the back contact point.
The left heel of the character touches the ground, just about to bear weight.
The trailing right foot is up on its toes.
The right and left legs are both extending in different directions, and the right leg still carries the body's weight.
The arms are totally separated for balance; the left leg is forward, the left arm is back, and vice versa with the right side.
Frame 16 - Left Leg Down Pose
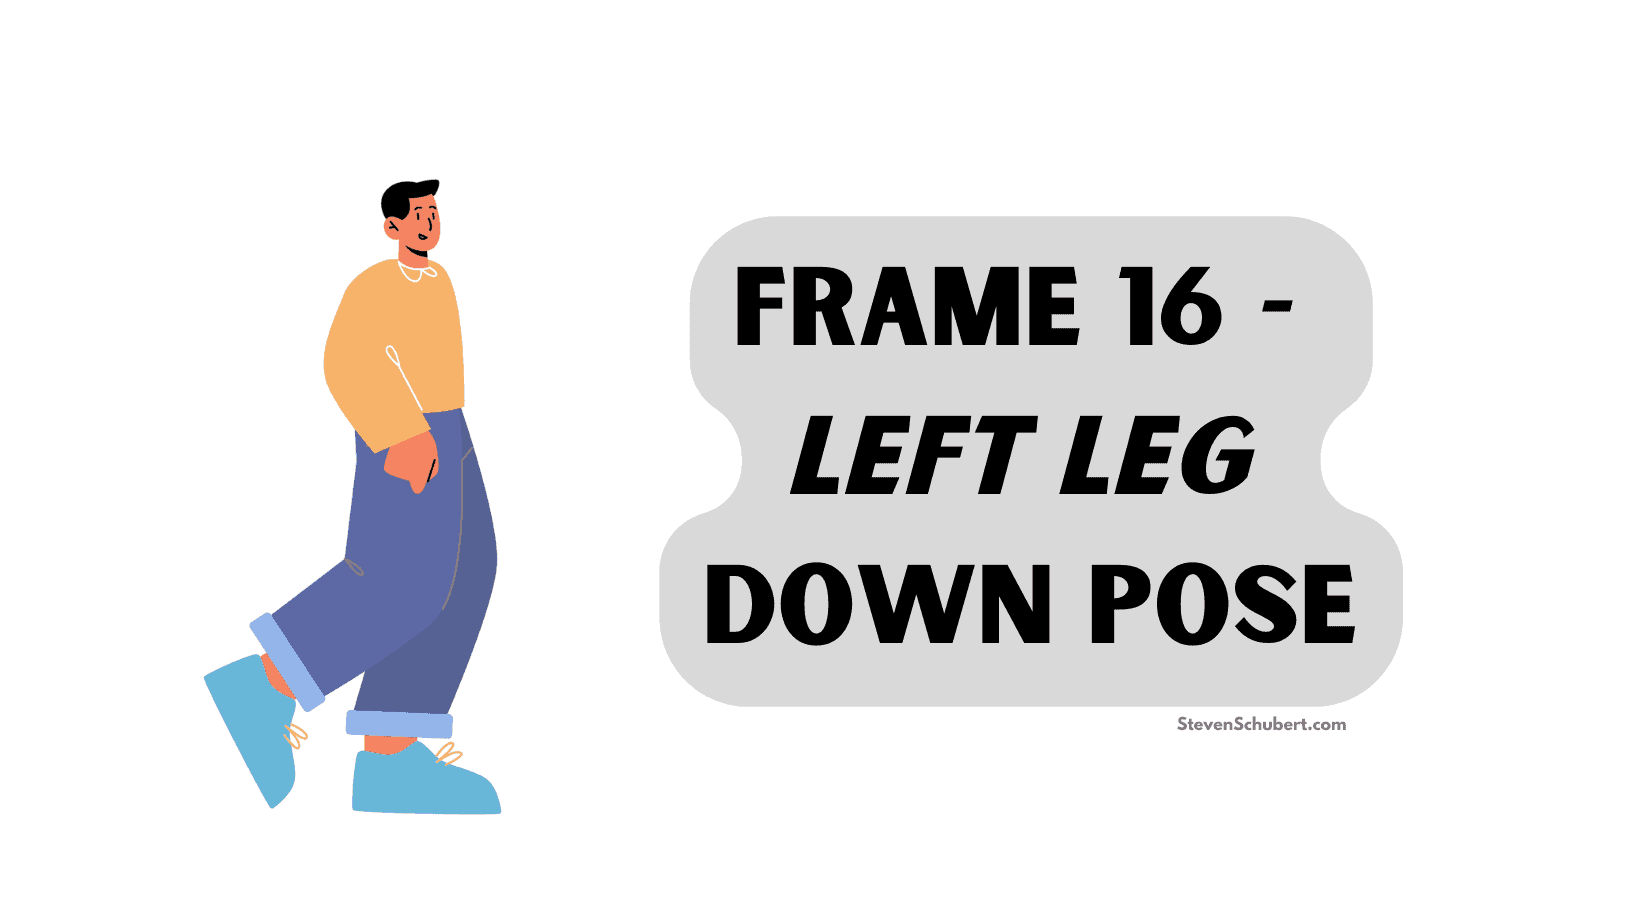
This pose occurs after the 'Left Leg Contact Pose'.
In the 'Left Leg Down Pose', the left foot is now flat on the ground, bearing the full weight of the body, causing a slight down and forward shift in weight.
The right foot is about to lift off the ground.
Both the left and right legs should be bent.
The arms swing begin to sway back to their neutral position.
The character is at the lowest point vertically in the cycle again, now on the left leg.
Frame 19 - Left Leg Passing Pose
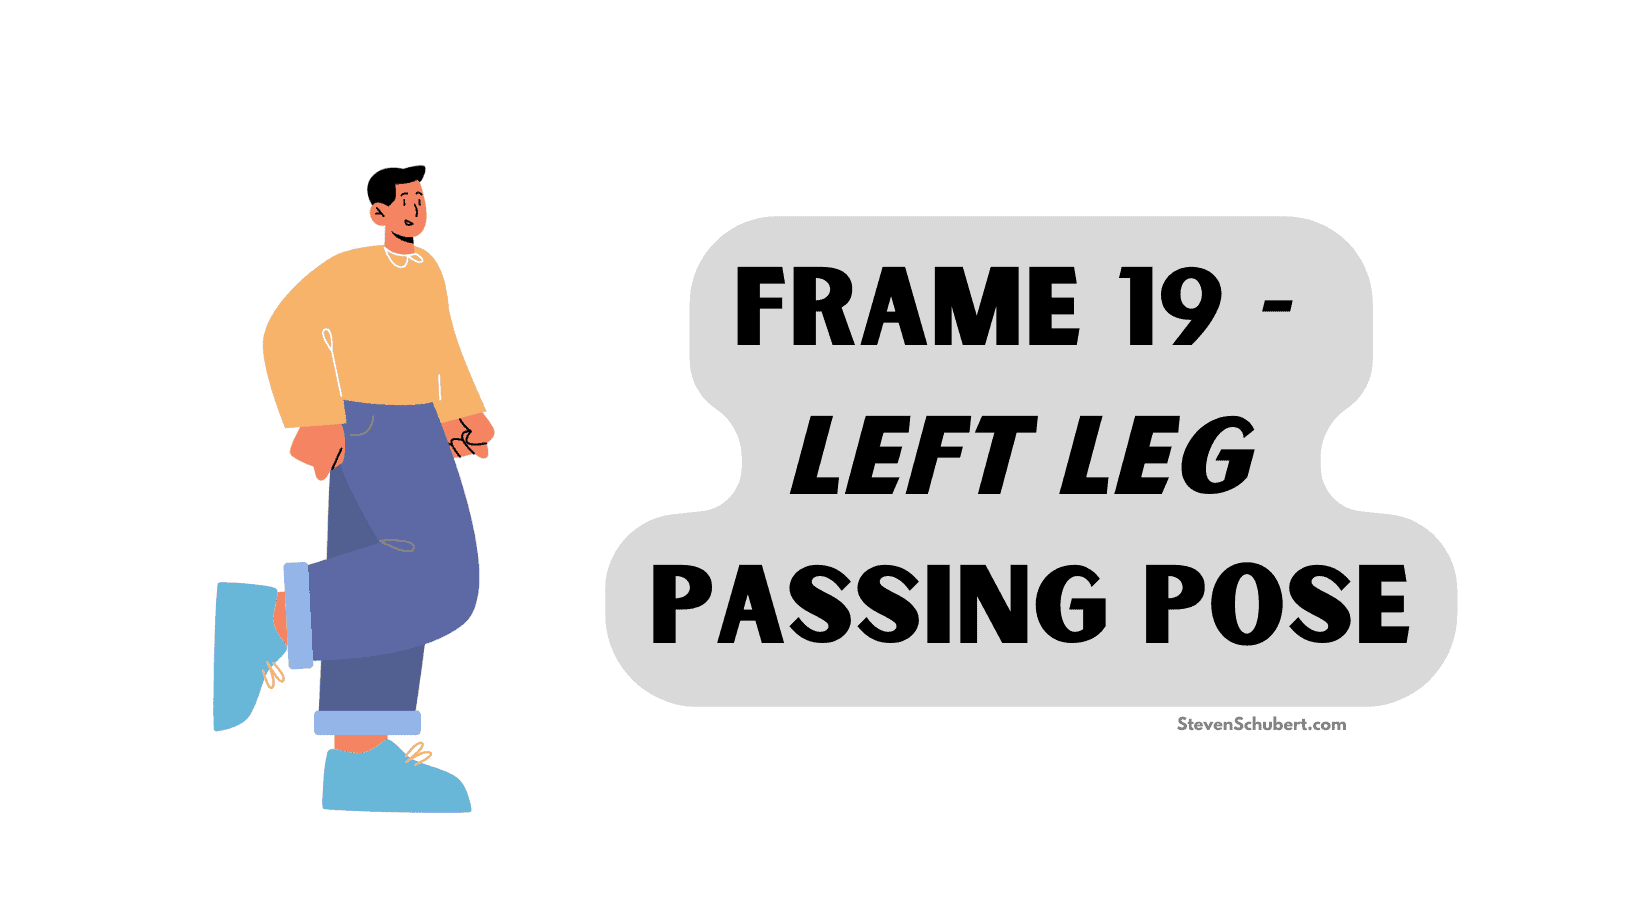
The second passing pose happens between the 'Left Leg Down Pose' and the 'Left Leg Up Pose'.
In the 'Left Leg Passing Pose', the now weight-bearing left leg is straight and directly beneath the body.
The right leg is lifted and bent at the knee, passing by the standing, about to take the next step.
The arms are at their neutral positions.
This pose marks the switch from one foot to the other.
Frame 22 - Left Leg Up Pose
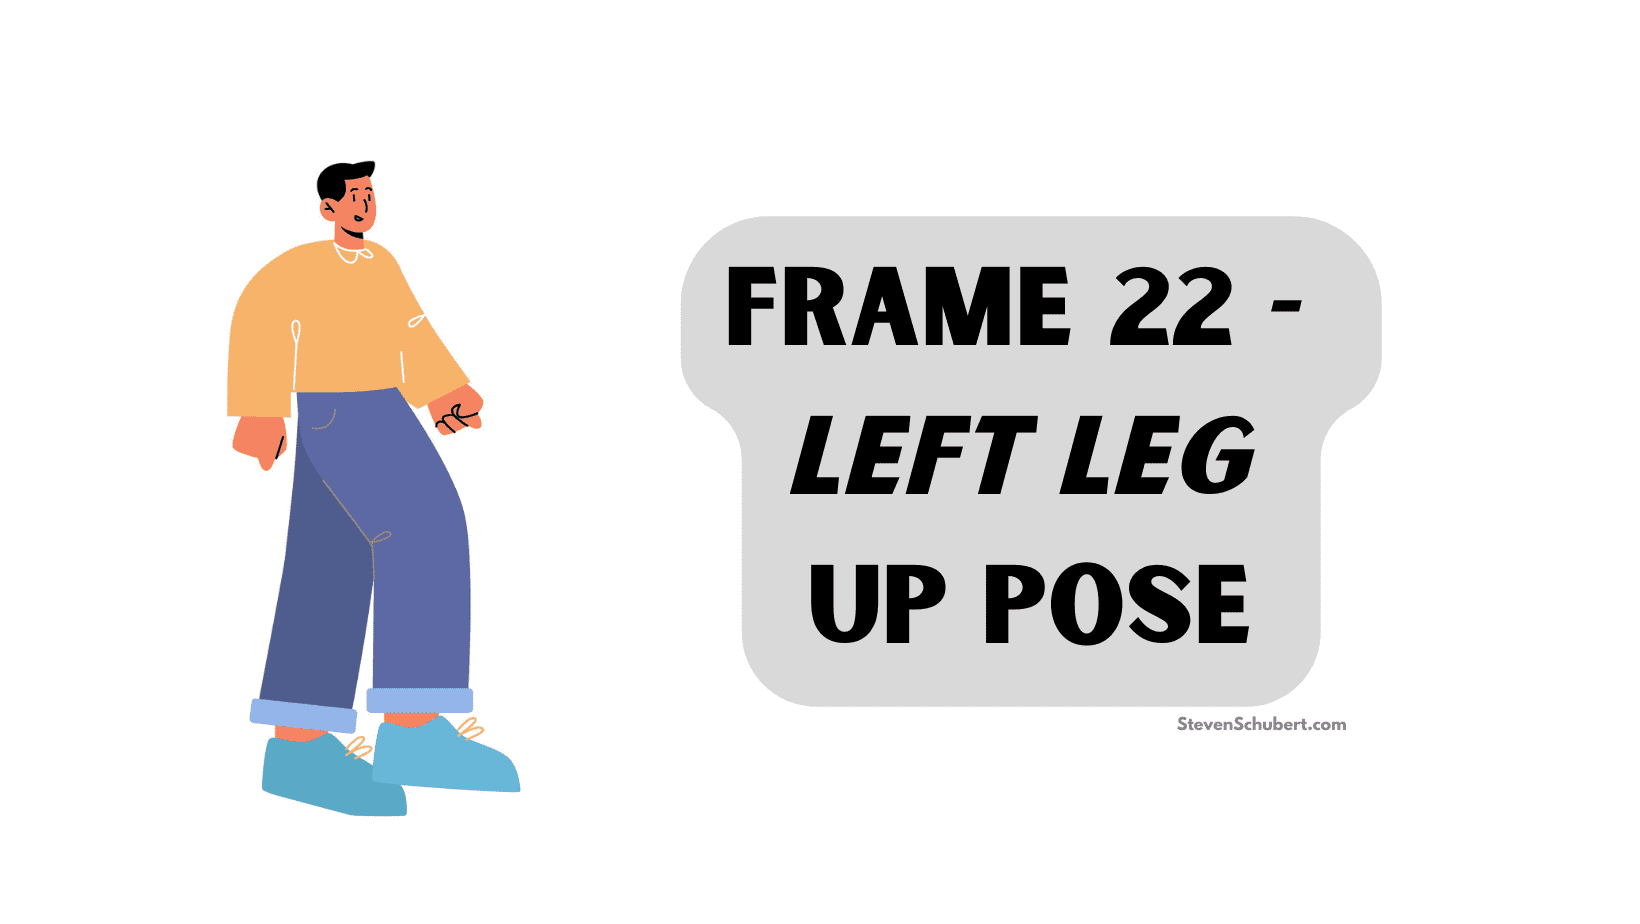
This pose happens after the 'Left Leg Passing Pose' and before the next 'Right Leg Contact Pose'.
In the 'Left Leg Up Pose', the character's body is at its highest point again as the left leg fully extends from the ground, propelling the body upwards and forwards.
The right leg is swinging forward, preparing to become the leading foot in the next 'Right Leg Contact Pose'.
The arms swing open.
The character's body is lifted up and forward.
Frame 25 - Right Leg Contact Pose
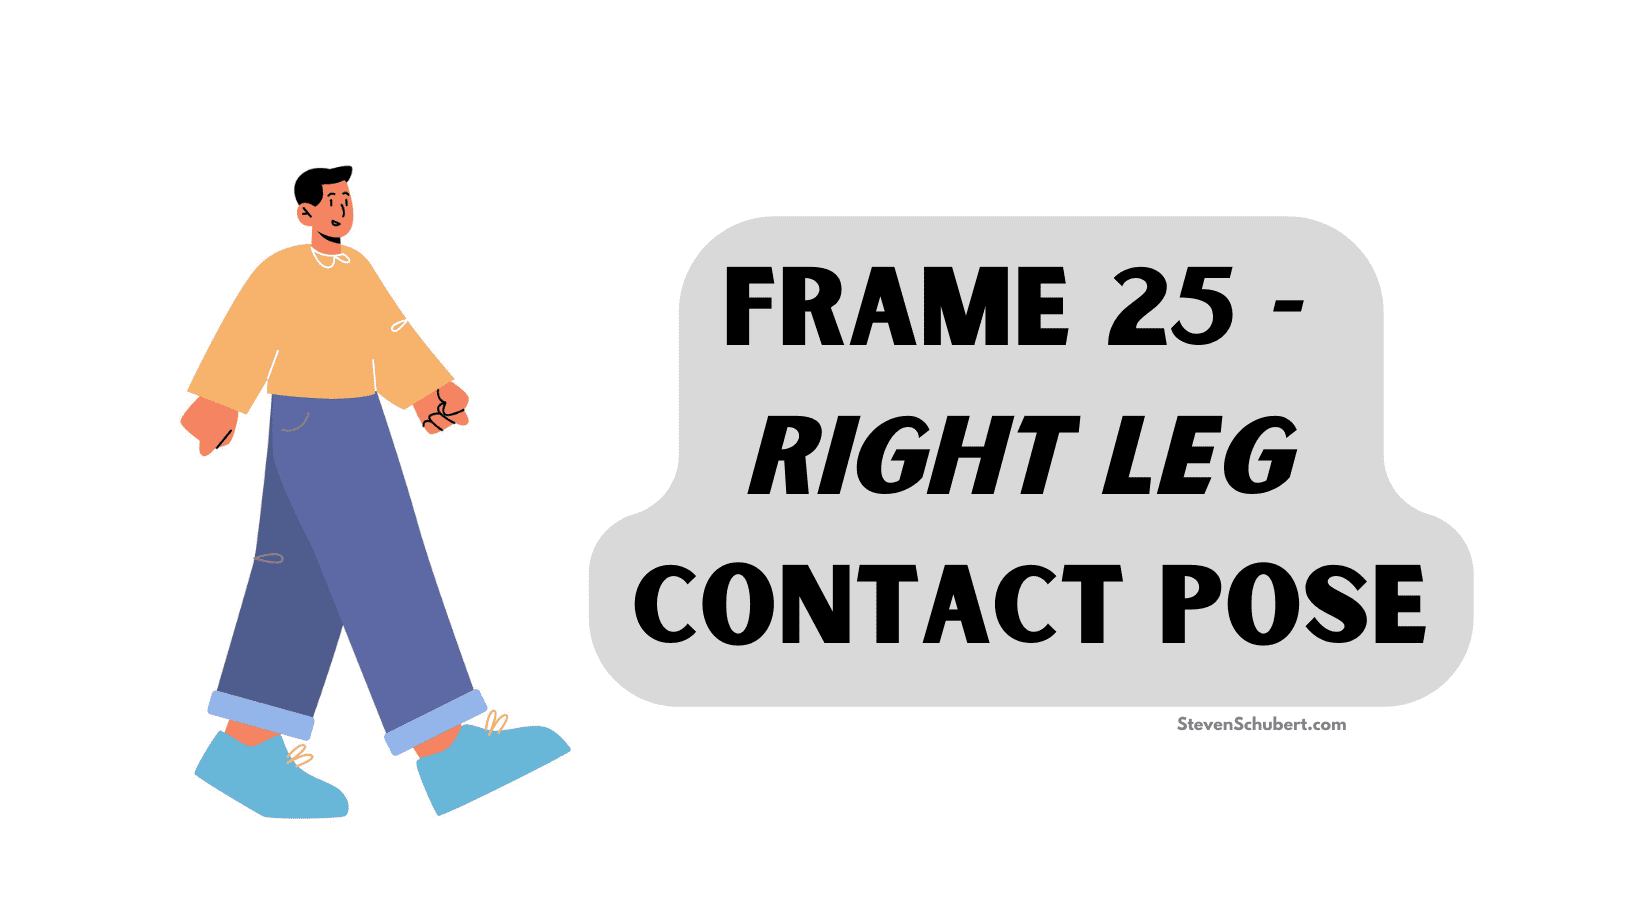
Now we repeat the entire process and return to our very first contact position, the same position from Frame 1.
This is the first frame of the next walking cycle.
The right heel touches the ground.
The trailing left foot is on its toes and behind the body.
The arms are fully extended.
Filing in the Gaps
After creating the first 8 main poses in a walk cycle, there are still 16 other frames that must be created in a 24-frame second of animation.
You are presented with two options to complete a full walking animation: frame-by-frame or tweening.
Frame-by-Frame
Traditional animation has always required the animator to draw every single frame, including the key poses and the intermediate in-between frames hooking up to those primary poses.
Tweening
With the advent of animation software, we can now simply draw the main poses that you want your character to hit, and then have the software automatically generate the remaining in-between poses, now formally coined tweens.
This results in saving the animator a good amount of work time.
However, you lose a certain degree of control over these in-betweens compared to if you were to draw your walk cycle frame-by-frame.
The Movement of the Body
Animating the legs is only part of a walk cycle animation; all body movements should be depicted realistically as the character walks.
Body Lean
Typically, characters lean slightly forward while walking to indicate momentum and forward movement.
Add Bend and Weight
A heavier character will bear more weight and therefore have more drastic movements. A lighter character will have smaller shifts in weight.
Hip and Shoulder Rotation
As the character walks, their hips and shoulders rotate subtly. The shoulder opposite to the forward-moving foot comes forward and the same happens with the hips.
Head Bob
Depending on the style of the walk, the character's head might bob up and down slightly with each step.
Arm Swing
Arms swing in opposition to the legs. This means if the right leg is forward, the left arm will be forward as well, and vice versa. This helps maintain balance.
Adding Life to Your Walk Animation

Every character shifts and moves a little differently depending on their personality, the show's style, the environment, and the situation.
A character can have a sneaky walk, a confident strut, a sad shuffle, and so on.
Speed
A character's walking pace depends on their own style as well as the context of the scene.
Offset
Certain body parts, such as the arms, can proceed in front or delay behind the legs by a few frames, exaggerating the emotion that your character is displaying.
Position
Pointing your character's head facing downward and dropping the arms as they sway during the walk cycle animation might give the impression that the character is sad.
Conversely, leaning the torso and the head back as the arms sway greatly might show the audience that the character is confident.
Breaking the Rules
Remember, these elements can be exaggerated or subdued depending on the style of the walk you want to portray.
Some animation styles might lean into surreal territory, and that may look like a departure from a realistic walk cycle.
FAQ
What's the difference between a side-profile walk cycle vs. a front-facing walk cycle?

The same principles apply to both. Side-profile walk cycles should begin with a contact pose. Whereas front-facing walk cycles should begin with an up pose.
How many steps does a character take per second?
A normal walk cycle animation is one or two steps per second.
How many frames is a normal walk cycle?
24 frames is the animation industry standard. Animators may use fewer frames per second to speed up movement. Or may use more than 24 frames per second to maintain smooth and detailed motion.
Conclusion
By following this guide on how to make a walking animation, you now have the knowledge necessary to create an awesome animation walk cycle.
Fascinated by the world of animation?
Check out my article on my experience working at an animation studio!
